A small update after the event last weekend:
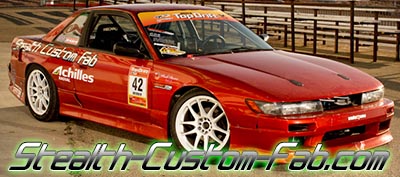
Well last Sunday I went to the Limitless Motor sports 2 event at Thunder Hill. I had a really good time out there and as always learned a lot. I had installed Stealth Custom Fab Fender Braces before the event and had no seat time with them. So trying to re-learn the car and the slick skid pad was a decent battle. There was a huge difference in the way the car felt in the front with the braces and it felt good. So after adjusting tire pressure and some shock settings I found a happy medium and got my drift on!!! I even got a taste of the Full track and quickly realized how big of a difference it really is out there!!!
Again wanna say Thanks to Jon (Stealth Custom Fab) for the AWESOME parts and Rob (Mestizo) for the coaching and Jay (J's Kustomz paint) for making the car look as good as it does!!!
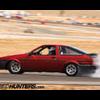
Here are a few pics for now...video later!
And here is a small battle scar from the event
Welcome to SDR Garage Forums
Register now to gain access to all of our features. Once registered and logged in, you will be able to create topics, post replies to existing threads, give reputation to your fellow members, get your own private messenger, post status updates, manage your profile and so much more. If you already have an account, login here - otherwise create an account for free today!
Infamous Jesse James Project S14
Started by InfamousJesseJames, Oct 05 2009 04:28 PM
#61
Posted 01 January 2011 - 01:06 PM
#62
Posted 02 January 2011 - 01:59 PM
#63
Posted 22 January 2011 - 11:11 PM
Well it was a nice day and I wanted to do something to my car...here is what I did:
Well I purchased a full ES bushing kit a long time ago when I bought the car. Little by little I am getting them all installed. Today I decided to replace the rear lower control arm bushings.
First off I found after awhile the best solution was to just disconect all the arms and the axel nut and pull the arm and upright out as one whole peice without undoing the ball joint.
After removing the arm/uprightI proceeded to use a Mapp gas torch and torch out the old bushings.
After the center metal sleeve fell out I scrapped all the hot melted rubber from the outer sleeve. Then used a small hack saw to cut the outer sleeve to aid in the removal of the sleeve. Trying to be careful not to cut all the way through and into the control arm itself.
After I made a slit in the sleeve I used a chisle and hammer to knock out the sleeve. Once I removed all the sleeves from the control arm I used a file to clean out any burrs so that there wont be any damage to the new bushings.
Here you will see the new ES bushings for the control arms:
I used the supplied ES bushing lube and lubed them up. Rob aided me in the pressing of the bushings. It was a huge pain in the ass but we got them all pressed in using several devices.
Here is some pics of the bushings all pressed in and ready to go on the car:
Yes this process was a huge pain in the ass and I hope to never do it again. But it was worth it I know.
Just driving the car on the street and down the road I could already tell a difference in the rear of the car. Its amazing how much of a difference they made. But I am still feeling there is something loose in the rear.
Next thing to do is the front lower control arms!!!
#64
Posted 26 January 2011 - 10:53 PM
QUOTE (InfamousJesseJames @ Jan 22 2011, 11:11 PM) <{POST_SNAPBACK}>
*insert entirely random and inappropriate comment here*
But.. *ahem*
I was just scrolling down the page really quickly and this chair just doesn't look right on a fast pass by.
Then on a second look.. it looks like cow teets.
#65
Posted 27 January 2011 - 05:39 AM
#66
Posted 27 January 2011 - 12:28 PM
QUOTE (InfamousJesseJames @ Jan 27 2011, 05:39 AM) <{POST_SNAPBACK}>
LOL...I borrowed that from Rob!!! It was in his garage!
Lol i love how u only tell "your" side of the story... that is Kelly's garage chair, and we all use it!
#67
Posted 30 January 2011 - 11:43 AM
SO I saw this on a Zilvia Members Zenki and I kinda like this idea. he said it works great, but I wanted to get some opinions on these latches and the idea. Let me know...
#68
Posted 30 January 2011 - 06:28 PM
That's an expensive way to hold the sides of your bumper up...
It works just fine, but not really my thing. Plus if your bumper catches something and is in a position to 'tear away' that latch/pin is way stronger than the bumper itself and is liable to cause a bit of damage.
IMO
drift car = no
show car/daily = ok.
Andrew
It works just fine, but not really my thing. Plus if your bumper catches something and is in a position to 'tear away' that latch/pin is way stronger than the bumper itself and is liable to cause a bit of damage.
IMO
drift car = no
show car/daily = ok.
Andrew
#69
Posted 31 January 2011 - 04:13 PM
Are you saying to remove your bumper quickly? Seems like a great idea.
If it's to hold the bumper up, I would have to agree with assassin.
#70
Posted 31 January 2011 - 07:21 PM
yeah it was just a thought and a good idea but after thinking about it I realized that too. I'll just stick to zip ties
#71
Posted 19 February 2011 - 08:32 PM
SPL SOLID DIFF MOUNT BUSHING INSTALL ON MY S14
Ok so before I had mentioned there was some clunking going on in the rear end of my car. So I changed the rear lower control arm bushings to see if it would fix the problem, which it didn’t. Although I could feel a difference there seemed to be more of a clunking but not only as I made u-turns but down a straight road when I hit bumps and it seems to be a lot more loose. After talking to Jonnie Fraz (Stealth Custom Fab) he mentioned there is an issue with the S14s with the factory diff rubber mount bushings and welded diffs creating a clunking noise in the rear. So he suggested solid diff mounts and that should fix the problem. So as soon as I could I ordered the SPL Solid Diff mount bushings.
With me finally having time off from my new job and a garage to work on my car I tackeled the project.
Here are the new bushings from SPL
Here is a pic of the stock hardware before taking stuff apart, rear of diff
Front of the diff:
When I got around to taking the drive shaft off I found that 2 of the 4 bolts were finger loose...not a good sign. Then when I moved onto taking the axles off the bolts on the driver side were almost finger loose...all 6 of them. I mentioned this to Rob (Mestizo) and he said that was probably my problem all along
here the diff is out
I put the rear bushings on ice to make them contract a lil bit so they were easier to press in.
Pressing them in with a nifty contraption that Rob and Jon had come up with
All installed back into the car and ready to roll...
Old Bushings:
a comparison:
After installing everything I went back over every nut and bolt under the car in the rear end and made sure every thing was torqued down, hopefully nothing comes loose. I will drive it around some then check everything again in due time.
Well I took it for a lil spin and got the car sideways it it felt a hell of a lot better. It is stupid stiff in the rear now!!! I turned it around several times and no clunking. I think I solved the problem...I am sure just tightening those bolts made a huge difference but the solid bushings made it way better. I just cant wait to drift it with the new set up
I will add a detailed "DIY" instruction thread later for others who wanna do this without taking the sub-frame out!!!
#72
Posted 20 February 2011 - 09:42 AM
#73
Posted 23 February 2011 - 07:29 PM
yeah between you and Rob, you guys help me a lot...I would be totally lost with out you guys
#74
Posted 28 February 2011 - 04:26 PM
I've got the exact same problem. When my tax money shows up I'm going shopping. WOOT WOOT. Oh dude! I still have those front signal lamps from URAS if you want them.
#75
Posted 08 March 2011 - 10:05 PM
here is the link to the Solid Diff Bushing Install I did...
if anyone is interested:
SPL Solid Differential Bushing Install
http://www.mestiso.n...p?showtopic=738
if anyone is interested:
SPL Solid Differential Bushing Install
http://www.mestiso.n...p?showtopic=738
#76
Posted 29 March 2011 - 03:39 PM
Well Just a lil update:
The past weekend I installed my new SPL front tension rods (v3) on my S14. Here is a couple of pics of the install and comparison of the stock tension rods w/ES bushings.
I took the car to school and just down the street I could feel the stiffness and the response was amazing in the front steering. I kicked it out a couple of times and felt great. Cant wait to slide it for reals.
#77
Posted 16 June 2011 - 12:54 PM
Ok so here are some updates:
I finally got around to installing my Inner and Outer tie rods from SPL.
SPL Pro Suspension front outer tie rod ends (v5) w/Tein Z33 inner tie rods:
and both of the boots were bad so I replaced those as well...
Old oem tie rods...
Passenger OEM was bent...
Old Vs. New
New SPL Parts installed
New boots
After the install I took the car to Les Schwab to get the front aligned and here are the specs I provided them:
1/8 inch toe out
-3.5 degrees camber
Left the caster alone at stock settings
Here is the spec sheet they gave me after the alignment:
Also I lucked out and found on Zilvia a "95" M/T OBD I ECU. So I got it and installed that, no more Check light for the auto ECU but I am lacking a Air Temp Sensor so I am still throwing that light
Also Jonnie Fraz (Stealth Custom Fab) told me about a place to powder coat my wheels the flat black I wanted. So I went over to Powder Coat It ( http://www.powdercoat-it.com/ ) off Old Roseville road and met up Steve and gave him two of my wheels and a few days later he gave them back to me:
#78
Posted 17 June 2011 - 11:24 AM
#79
Posted 17 June 2011 - 11:48 AM
QUOTE (mestizo @ Jun 17 2011, 12:24 PM) <{POST_SNAPBACK}>
Powder coating looks sweet.
Yeah it looks a lot better in person. I tried to capture the beauty the best I could. Also the guy did one hell of a job fixing the curb rash. Seriously they look brand spanking new. Cant wait to get the rest of them done and get some pics of them on the track, he said he would like to post some on his website.
#80
Posted 18 June 2011 - 04:30 PM
QUOTE (InfamousJesseJames @ Jun 17 2011, 12:48 PM) <{POST_SNAPBACK}>
... he said he would like to post some on his website.
That would be pretty sweet! They do look like they would be dope looking in person.
Andrew
1 user(s) are reading this topic
0 members, 1 guests, 0 anonymous users